Running Ubuntu in Hyper-V is great for virtual labs and testing environments, but one common issue many users face is getting the screen resolution to display correctly — especially full-screen or high resolutions. In this guide, you’ll learn the best methods to adjust your Ubuntu resolution inside Hyper-V, including modifying GRUB and enabling enhanced sessions.
Whether you’re using Ubuntu Desktop or Server in a VM, this guide gives clear steps that actually work.
📌 Why Ubuntu’s Resolution Might Be Small in Hyper-V
By default, Ubuntu running in Hyper-V may display a low resolution (like 1024×768) because the Hyper-V video driver doesn’t expose dynamic resolution support fully. This is especially true if enhanced session mode isn’t configured or the GRUB boot options don’t include Hyper-V framebuffer support.
🛠 Method 1: Set the Resolution via GRUB Configuration
This method works on most Ubuntu desktop VMs and allows you to specify a fixed resolution.
✅ Step-by-Step
1. Open Terminal inside Ubuntu:
sudo nano /etc/default/grub2. Find this line:
GRUB_CMDLINE_LINUX_DEFAULT="quiet splash"3. Add the Hyper-V framebuffer parameter, for example:
GRUB_CMDLINE_LINUX_DEFAULT="quiet splash video=hyperv_fb:1920x1080"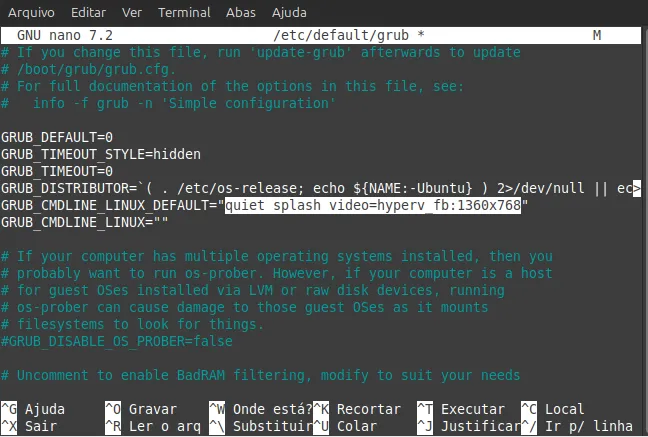
Replace 1920x1080 with the resolution you want.
4. Save and exit
Ctrl + O, Enter, Ctrl + X
5. Update GRUB:
sudo update-grub6. Reboot the VM:
sudo reboot🖥️ After reboot, Ubuntu should start at the resolution you specified.
🧠 Why This Works
This technique forces Ubuntu’s kernel to use a Hyper-V framebuffer (hyperv_fb) with the resolution you choose. Since Hyper-V doesn’t always support automatic dynamic resizing, this gives you control over the display size.
🔹 Alternative: Use Hyper-V Enhanced Session + PowerShell
If you’re on Windows and want a more flexible approach (especially for desktop environments), you can enable enhanced sessions or set custom video settings:
PowerShell Command (Host Machine)
Set-VMVideo -VMName "Ubuntu" -HorizontalResolution 1920 -VerticalResolution 1080 -ResolutionType SingleThis command sets custom resolution values from the Hyper-V host directly.
📌 Tips for Best Results
✅ Install Linux Extra Packages
For better Hyper-V integration:
sudo apt install linux-image-extra-virtualThis can improve performance and support for certain Hyper-V features.
✅ Use Quick Create Image (Windows)
If you installed Ubuntu using Hyper-V’s Quick Create, enhanced session support and dynamic resizing may already be configured.
⚠️ If the screen still looks wrong
- Try a different resolution (e.g., 1366×768, 1280×720).
- Ensure Hyper-V integration services are enabled.
- If using Ubuntu Server (no GUI), the GRUB method is usually the only reliable option.
❓ FAQ
Q: Can I use xrandr instead?
A: For VMs without enhanced sessions, xrandr often won’t work because Hyper-V does not provide a real display driver for Linux guests.
🧾 Conclusion
Adjusting Ubuntu’s screen resolution in Hyper-V can be done reliably by modifying GRUB to include a Hyper-V framebuffer resolution or using Hyper-V host controls like Set-VMVideo. These methods help you achieve full-screen or higher-definition displays inside your Ubuntu VM — ideal for testing, desktops, or homelab setups.
Want to go deeper into self-hosted services and homelab setups?
Explore more Homelab & Self-Hosting guides here →