Rufus is a lightweight, free, and highly reliable utility used to create bootable USB drives and memory cards from system images. Whether you want to install a Windows or Linux operating system, prepare a recovery USB, or create a diagnostic tool, Rufus simplifies the process with speed and efficiency — making it essential for both everyday users and IT professionals.
In this guide, you’ll learn exactly what Rufus is, how it works, the step-by-step process to create a bootable USB, and key advantages of using this tool.
💡 What Is Rufus and Why It Matters
Rufus is a free utility designed to format and create bootable USB devices and memory cards from ISO image files. It stands out for its speed, simplicity, and wide compatibility with different filesystem formats like FAT32, NTFS, UDF, and exFAT — making it suitable for installing new operating systems or creating recovery media.
🧠 How Rufus Works
The process Rufus uses is very straightforward and user-friendly:
- Device Selection — Choose the USB drive or memory card you want to use.
- Image Selection — Load an ISO file containing the operating system or tool you want.
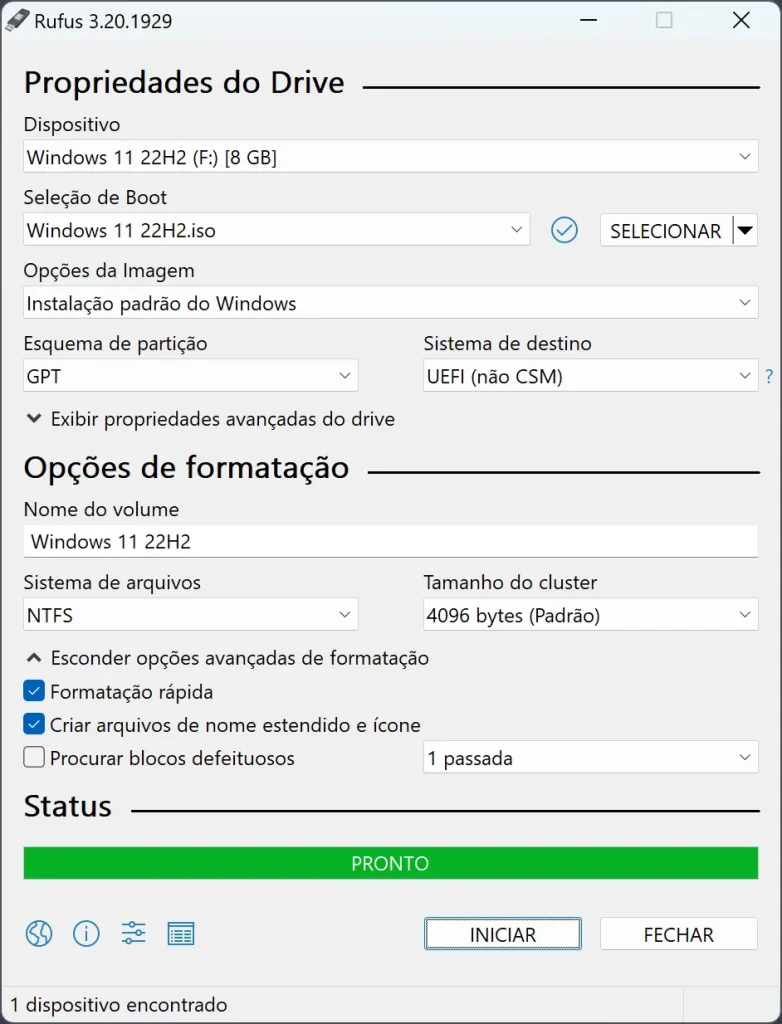
- Configuration — Select filesystem and partition options if needed.
- Creation — Start the writing process and wait until Rufus finishes.
This simplicity, combined with fast performance, is why Rufus has become one of the most popular bootable media creators available today.
📌 Step-by-Step: Creating a Bootable USB with Rufus
🪟 Step 1 — Download and Install Rufus
- Visit the official Rufus website (rufus.ie).
- Download either the portable version (no installation needed) or the installer.
- Run Rufus to open the interface.
🔌 Step 2 — Prepare the USB Drive
- Insert your USB stick or memory card into the computer.
- Rufus should detect it automatically — select it from the dropdown.
⚠️ Important: Creating a bootable USB will format the drive and erase all existing data on it. Always back up important files before continuing.
📁 Step 3 — Load the ISO File
- Click “Select” to open the file picker.
- Locate and choose the ISO image you want to flash (e.g., Windows, Ubuntu, diagnostic tools).
- Adjust filesystem and partition options if necessary.
🚀 Step 4 — Start the Bootable USB Creation
- Double-check your settings and selected drive.
- Click “Start” to begin the process.
- Rufus will format the drive and write the image — wait until it completes.
Once finished, your USB drive will be ready for booting and installing systems.
🎯 Advantages of Using Rufus
✔ Fast Creation — One of the quickest tools available for USB boot creation.
✔ Wide Compatibility — Works with a variety of ISO formats and filesystems.
✔ Portable Option — No installation required if using the portable build.
✔ Free and Open Source — Completely free to use with no limitations.
These features make Rufus ideal for technicians, home users, and homelab builders who frequently install or test operating systems.
❓ Frequently Asked Questions
1. Is Rufus safe to use?
Yes — Rufus is widely trusted and safe as long as you download it from the official website.
2. Which systems does Rufus support?
Rufus supports Windows, Linux, and other ISO-based operating systems.
3. Can I use Rufus if there are files on the USB?
No — creating bootable media will erase all existing data on the USB drive.
4. Is there a macOS version of Rufus?
No — Rufus is primarily a Windows utility. macOS users can use alternatives like balenaEtcher.
5. Is Rufus free?
Yes — it’s completely free and open source.
🏁 Conclusion
Rufus is an essential tool for creating bootable USB drives quickly and reliably, with a straightforward workflow that even beginners can follow. Whether you need to install a new operating system, create recovery media, or prepare tools for testing hardware, Rufus remains one of the best choices available.
Using essential tools for Linux and homelab?
Explore more Tools & Utilities tutorials →